Creating a C# based, XUnit + Selenium Tests using Visual Studio Code in a Linux operating system machine.
Prerequisites :
- Visual Studio Code : We will be using Visual Studio Code 1.28.2 for setting up the selenium tests. If you want to know about installing the Visual Studio Code for Linux, please check the url
- .Net Core SDK: We are using XUnit tests to run the selenium webdriver tests. This will require .Net Core SDK to be installed. If it is not installed already, please install using the link
- Linux Operating system : Ubuntu 18.04.1 LTS
Lets get started : ( You can clone the Repo for the source codes used in this post )
Setting up a C# extension for Visual Studio Code
- Launch the Visual Studio Code using the command: $ code . from the Terminal.
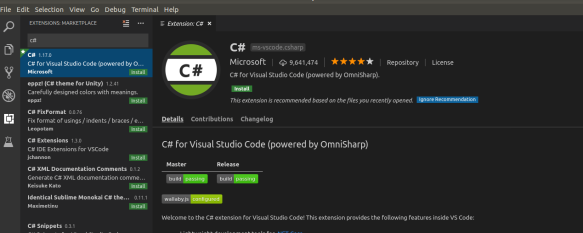
- From the Extensions menu (Ctrl+Shift+X) search for a C# extension. (You can use the Omnisharp) and install it. Once installed, click Reload to Active option. This will add the C# extension to your Visual Studio Code.

Installing XUnit packages for the project
- Create a folder where you want to store your tests :
- Ensure the installation of the .Net Core SDK: Navigate to the folder where you want to create/store the tests. From the folder open a terminal (Ctrl+Shift+T) and then run the command: $ dotnet –version
![]()
- Now create a new Class Library: Run the command: $ dotnet new classlib . This will create a .Net standard library class.


- Updating the .csproj file with target framework as netcoreapp2.1: Open the .csproj file created inside the folder. Update the TargetFramwork to- netcoreapp2.1. The updated .csproj file will look like the below.

- Build the project: Use the command: $ dotnet build to verify the project builds successfully.

Read more details about the XUnit package setup please check the link
Setting up XUnit packages for the project
- Open the Visual Studio Code from the folder where we created the class libraries. This can be done by opening a terminal and running the command: $ code .
- Install Nuget Manager extension for Visual Studio Code: (If you have already installed this then you can skip this step). You can use the extension manager(Ctrl+Shift+X) and search for Nuget package manager and Install it. Once installed Click on Reload to active.

- Install the Xunit packages for the project: Using Nuget Manager: Add Package, Packages to add :
xunit
xunit.runner.visualstudio
Microsoft.Net.Test.SDK

- Once the necessary packages are added, open the .csproj file to verify. The .csproj file will look similar to below.

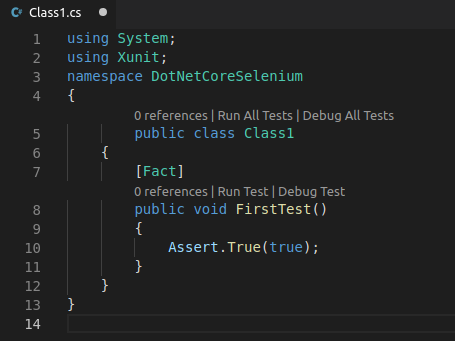
- Create and Run XUnit Tests: Now we can create and run our XUnit tests using Visual Studio Code. Go back to the VS code and Edit the Class1.cs file to add a new Test method. Run the tests using VS Code or from terminal using the command: $dotnet test
Updated Class1.cs file :

Running the tests in Terminal (using the command: $ dotnet test)

Setting up Selenium Packages for the project
- Install Selenium Webdriver Package : Now from Visual Studio Code , Open the command pallette (Ctrl+Shift+P) , type Nuget Package Manager and Select Nuget package manager: Add Package – > Type Selenium.Webdriver and press enter. Then select the latest version. This will install the selenium package automatically.

Install below additional packages in the same way.
Selenium.Support
Selenium.Chrome.WebDriver.
- Updated .csproj file: Now after adding the selenium related packages the .csproj file will look like the below.

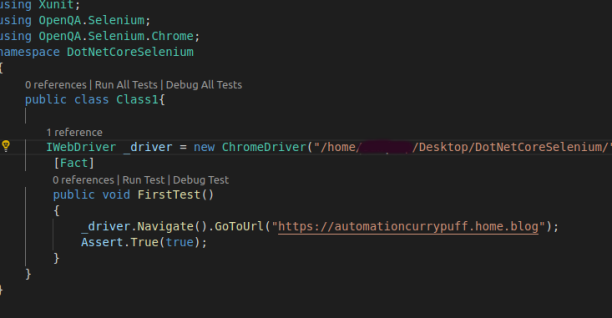
- Create and Run Selenium Tests: Now since everything is ready and set, we can create and run our selenium tests. Update the Class1.cs file with the below codes and Run the test using the same command: $dotnet test
Updated Class1.cs file :

Running Selenium Tests using Terminal:

Wohoo!! We are all done. Now create your test scripts and enjoy the XUnit. Comment below for any queries. Thanks.
Thank you so much for your help. A little research and everything works as expected.
LikeLike
Good to know. Thanks for your comment.
LikeLike
Thank you so much but how can I do the same in macOS
LikeLike
The steps are mostly the same. If you are looking for specifics you can check the medium article by Rakesh .
View at Medium.com
LikeLike
I tried it, but I am getting an error when I run my test after adding selenium chrome driver.
Error Message:
System.IO.FileNotFoundException : Could not load file or assembly ‘netstandard2.0assembly, Version=0.0.0.0, Culture=neutral, PublicKeyToken=null’. The system cannot find the file specified.
LikeLike